27 November 2009

Opera Cake

Thanksgiving is a worthy event to attempt an epic project. So I thought I should make an Opera cake to bring to a Thanksgiving dinner our friends hosted.

This was my first ever Opera cake, and I was nervous. The recipe I found at the Splendid Table looked intimidating. Four pages of directions! Adapted from Dorrie Greenspan's book, this recipe dominates the culinary blogdom: numerous google returns on "opera cake recipe" refers back to this master recipe. Wanting to bake enough for a crowd, I resort to it (other recipes cater for 8 people). I had to read it thoroughly several times before the direction sinked in.

Essentially, classic Opera cake consists of layers of almond sponge cake (joconde/gioconda) drizzled with coffee syrup and slathered alternatively with french-style coffee butter cream and chocolate ganache. Although seemingly complicated, there are only two elements of the cake that one has to pay close attention to: the sponge cake and the french style butter cream. The other are simply chocolate ganache and sugared espresso (chocolate ganache is simply chocolate chips and cream melted in your humble microwave, and espresso... well... how can one simplify espresso?). Aside of coffee-chocolate classic, I've found many other variations online, such as the enticing Green Tea Opeara cake!

My patience in scouring the internet for better direction was rewarded with joepastry.com, a no-fuss, non-pretentious blog that guides me with step-by-step photograph on opera cake assembling (there are other baking techniques, too). Joe also gives me direction on how to make the french style butter cream, cake syrup, and joconde cake (and believe me you, he ALSO uses the Splendid Table recipe!). I followed his 4 layer instead of Greenspan's 3 layer cake. Thanks to Joe (whoever you are!), for a novice, I managed to pull a respectable Opera cake.
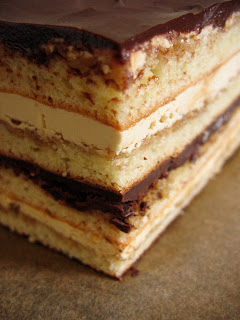


Some lesson learned:
1. For the cake, I cut down the sugar from 2 to 1.5 cups, because there would be coffee syrup to moist the cake.
2. At 425F, my oven was to hot and almost burned the bottom of my cake. I still need to calibrate the temperature and baking time to make the cake.
3. I should try to make thinner sponge cake to create more dramatic layers.
4. I would use more espresso and less sugar for the coffee syrup, and drench the cake more in the espresso next time.
5. After putting the butter cream on the cake, I put the cake in the fridge for 10 minutes to let the butter cream harden, enough to withstand the weight of the next layer. But...
6. I should not do so for the ganache layer, because it hardened and the next cake layer did not stick to the ganache. I only found out when I sliced the cake.
7. I put the chocolate glaze topping after I let the cake chill overnight in the fridge. This help the cake to stabilize.
8. My glace was not liquid enough to be poured, I ended up spreading it with a knife. So my topping was not smooth. It requires equal weight of chocolate chip and cream to make liquid glaze.
9. I let the glaze solidified before slicing the cake, and I used knife heated with hot tap water to make a clean slice.
10. I need to buy a decent kitchen scale.

The cake was a hit. I am encouraged to make it again, now that the steps have been demystified. (Thanks, Joe!)


18 November 2009

Galette for Brunch

I had posted the link to the Tomato, Corn and Cheese Galette in an earlier posting. Here are some pictures of my attempt last Sunday. I was rushing to get this done to take to a friend's house for brunch that I forgot to pictures after taking it out from the oven. But I did remember to take a picture of the leftover slice.

Before putting it in the oven


I do like the combo of the corn, caramelized onions and tomatoes, though next time I think I will try other combination for the filling. Perhaps spinach and feta, mushrooms and thyme, or roasted squash, caramelized onion and ricotta.


Nom, nom, nom!

16 November 2009

Lemon-yoghurt custard topped with walnuts

A tip via @yougrowgirl led me to Mercer Street Books where I purchased a hardcover copy of Moro, The Cookbook for less than $10. Moro was written by Sam and Sam Clark. After looking at all the recipes, I marked several soups, vegetable starters, and most of the desserts, including the Yoghurt Cake with Pistachios. The custard I baked is a modified version of the yoghurt cake. The Clarks described the cake's consistency as "a light sponge on top with a wet custard below."

It's really important to read the directions, carefully! Instead of separating 3 eggs, I whisked 3 eggs - yolks and whites. Other substitutions: 1/4 cup dark brown sugar for 70g caster sugar; 1T vanilla extract for 2 vanilla pods; almost 160z of Greek yoghurt for 350g yoghurt; and a generous handful of walnuts for 30g pistachios.

Despite not incorporating softly whipped, sugared whites, the resulting custard was light. The dominant taste was lemon with a nice back note of vanilla and tangy yoghurt. Read the L.A. Times review of the cookbook. Read yougrowgirl's review of Moro East.

14 November 2009

Tomato, Corn and Cheddar Pizza

Hello, people! I am excited! I now have an oven! Not just a toaster oven (though I love my toaster oven too), but a real oven. Well, it is a mini-table-top oven but it is a great oven! Even has a rotisserie function (which comes with something that looks like a devil's pitchfork--a little scary!). But yay! I am now baking-empowered. I can now bake, roast, toast and grill to my hearts content. That over-ripe banana will now make its way to becoming a muffin, instead of being thrown in the freezer for future smoothies (also a great use of over -ripe banana, by the way). I can now finally bake that sour cream chocolate cake that I have been dreaming about. I can bake my favorite chocolate chip cookie recipe. I can bake bread. I can roast chicken....ahh...the possibilities. Stay tuned, my friends....

Today for lunch, in honor of my new oven ( I may have to give oven a name soon), I decided that I just have to bake something. I decided a quick pizza will satisfy my sense of urgency in testing out the oven, while fast enough to make that I can actually have lunch, at lunch time. While I hope to bake homemade pizza soon enough with my new oven, today, I opted to use wholemeal pita bread as the base for my quick pizza.

So basically, slice pita open into two. Top with available toppings (rumage through fridge). Drizzle with olive oil. Salt. pepper. Bake in hot oven (260 C) for 10 minutes. Today, my pizza topping is inspired by this galette recipe from Alexandra's Kitchen, a food blog that I just discovered. It is a beautiful blog. So inspiring! Do check it out. The original recipe typed out generously here by Alexandra (I am so lazy about these things and am always delighted to be able to provide a link instead) is from Fine Cooking Magazine (August 2000).

I plan to make the galette tomorrow for a brunch get-together. Will report back on that. As for this pizza, I absolutely loved the combination of fresh corn, onions, cheddar chesse and ripe tomatoes. I used cheddar cheese bc that was what I had in the fridge. The original recipe uses gruyere.

Before

After

Ready to eat. Chomp!

11 November 2009

Non-food post :P

A while ago, I went through a "theoretical constipation." I tried to approach my topic from the vantage point of "subjectivity formation." It didn't work. With the data I have, it can't work. I had a panic attack; I had to distract myself.

So I jumped into a project that resulted in this:


Fish Croquette


I have had this Tapas recipe book for a while and I have been drooling over their seafood tapas. I found myself with healthy stock of frozen cod recently, and I thought I'd try the Fish Croquette recipe.

In simple terms, fish croquette consists of rather thick bechamel sauce (that uses the milk used to boil the cod), flaked boiled cod, enough capers to create the tangy flavor, paprika, salt, pepper and chopped parsley (I didn't have it on hand, so I skipped that). The trick of making croquette from this rather gooey substance is to cool it in the fridge twice. The first takes 2-3 hours or overnight, to enable slicing the paste; and the second takes about 1 hour after the sliced paste is breaded with Panko (my favorite) and black sesame seed.


I keep my breaded croquette overnight in the fridge when I am too lazy to fry it right away. Such a delight to bite into the cruncy texture, and met with smooth, fishy, creamy and tangy core. Heavenly. I consider this a treat, due to the sinful amount of calories it contains.

01 November 2009

Carrot-cornmeal-ginger muffins with sour cream frosting

I had five, skinny carrots left from a bunch which I bought to re-create the carrot-tahini salad dressing served at Dojo in Greenwich Village (NYC). I juiced the carrots with a small Gala apple and used the mash in the muffin preparation. The muffin recipe is from Coconut & Lime and the frosting recipe is from Smitten Kitchen (both have been modified). Muffins modified: white cornmeal; milk not buttermilk; mashed carrots and apple filling. My large muffins baked for 20-25 minutes (I used a silicone 6-muffin pan). Frosting modified: 4 oz sour cream with vanilla extract and honey to taste The muffin mix yielded six (6) large muffins and five (5) small muffins.

From mash to mix:

From mix to muffins, small and large:

The sour cream frosting - not too sweet - is a perfect complement. The carrot-apple mash filling created a moist muffin. The cornmeal added a slight texture and the ginger and nutmeg added warmth. Perfect for a slightly overcast day.